Sunday, 19 June 2016

EXTRAS - I

MATERIALISTIC WALLPAPERS


Here I present to you all my collection of Best Materialistic Wallpapers that you will not be able to find anywhere else(....yeah thats true!!)

And Thats not it....New Wallpapers would be added EVERY-WEEK!!!


DOWNLOAD IMG1


DOWNLOAD IMG2


DOWNLOAD IMG3


DOWNLOAD IMG4


DOWNLOAD IMG5


DOWNLOAD IMG6


DOWNLOAD IMG7


DOWNLOAD IMG8


DOWNLOAD IMG9


DOWNLOAD IMG10


tags{ignore}: best wallpaper apps android best wallpaper app for android 2015 best paid wallpaper app for android best live wallpaper app for android best wallpaper android best wallpaper app for iphone free wallpaper apps for android phones android wallpaper app source code

Friday, 10 June 2016


EVERYTHING YOU NEED TO KNOW - MINIMAL ADB & FASTBOOT

This is my first "Everything You Need To Know" Post. Under this I will be covering all the important Codes and their Executions plus Results of MINIMAL ADB & FASTBOOT - one of the most important aplication needed for handling your android device.


INTRO - The Boring Part First ;)

ADB and Fastboot are arguably two of the most indispensable tools used when working with Android devices. If you really want to modify, debug, and tweak along with their countless uses in rooting, and other procedures ADB and Fastboot are a must for any Android device owner. Typically if you want to install ADB and Fastboot you have to download and setup the Android SDK (If you really want to learn about Android Development I highly recommend downloading and installing the full Android SDK from here), but this can be unnecessary for people who just want to install ADB and Fastboot and do basics such as rooting, unlocking, flashing roms, etc. To simplify the process xda developer shimp208 created a windows installer that will install the latest version of ADB and Fastboot for you quickly and easily. The total installation of Minimal ADB and Fastboot is around 2 MB in size (Compared to the 500+ MB size of the complete Android SDK) making it very lightweight.

Now, the Useful Informations:

  • Let us first see how to install Minimal Adb and fastboot


  1. Download the Minimal ADB and Fastboot from here or select from the remaining eight mirror downloads from here . If nothing works, go here , select "begin download", and then  "primary download".
  2. Open it and install it to the location that is given by default. If no location is set, it is preferred to install here- C:\Program Files (x86)\Minimal ADB and Fastboot


                                       Minimal ADB and Fastboot Setup Screen

       3. After installing it, open it, you will get the command screen as shown below:


                                                       START CODING!!!

                   LIST OF IMP ADB FASTBOOT CODES

  • BASIC COMMANDS


  1. adb devices - Shows a list of devices attached to the computer.
  2. adb reboot - Reboots a device connected to the PC.
  3. adb reboot recovery - Reboots a device into recovery mode.
  4. adb reboot download - Reboots the connected device into download mode {For Samsung Galaxy Series}.
  5. adb reboot bootloader - Reboots a device into Bootloader.
  6. adb reboot fastboot - Reboots a connected device into Fastboot mode.

  • INSTALLING/UNSTALLING/UPDATING APPS WITH ADB

  1. adb install<ApplicationpathPackagename>.apk - ADB install let’s you install APK files directly to your phone. To use this command type adb install application path, as shown in the commands part and hit enter key and it will start installing the app on your phone. e.g adb installC:/Users/Sadiq/Desktop/CandyCrushSaga.apk. If process succeeds it will show you “Success” in the command window.
  2. adb install -r<ApplicationpathPackagename>.apk - If you have already installed an app, and you just want to update it then this command will let you do so. e.g adb install -r C:/Users/Sadiq/Desktop/CandyCrushSaga.apk

  • PUSH/PULL FILES:

  1. adb pull <path-of-the-file> - E.G. : adb pull system/apps/Settings.apk .The Settings.apk file will be pulled to the adb folder on your pc.
  2. adb push <source-path> <target-path> - It takes the file from the source address on your pc and transfer it to the target path on your device.
  • BACKING UP SYSTEM AND INSTALLED APPS:
        Create system_apps and installed_apps folder for your convenience.
  1. adb pull /system/app backup/system_apps - backs up all the system apps of your phone to the Systemapps folder that you created in the ADB folder.
  2. adb pull /system/app backup/installed_apps - backs up all the installed apps of your phone to the installedapps folder that you created in the ADB folder.
  • BACKGROUND TERMINALS:
  1. adb shellstarts the background terminal.
  2. exitexits the background terminal.
  3. adb shell <command you want> - E.g. adb shell su . Switches to the root of your phone. Please make sure that you’re rooted in case you wish to use adb shell su.
  • FASTBOOT COMMANDS:
 NOTE: TO FLASH FILES USING THE FASTBOOT COMMANDS, FIRST PLACE    THE DESIRED FILES WHERE YOU HAVE INSTALLED ADB FATSBOOT. {In my Case- C:\Program Files (x86)\Minimal ADB and Fastboot}
  1. fastboot flash file.zip - Flashes a .zip file to your device.
  2. fastboot flash recovery recoveryname.img - flashes the recovery file to your device.
  3. Fastboot flash boot bootname.img - Flashes a boot or kernel image 
  4. Fastboot getvar cid - shows you the CID of your phone.
  5. <fastboot erase system> <fastboot erase data> <fastboot erase cache> - {use the codes without <>, one by one }- In case you want to restore a nandroid backup, you’ll have to delete the current system/data/cache of your phone first. Before doing this, it is always recommended to have backed up your system using a custom recovery>backup option and copy the backed up .img files to Fastboot folder. Then performing these commands will erase everything.
  6. <fastboot flash system system.img> <fastboot flash data data.img> <fastboot flash cache cache.img> - {use the codes without <>, one by one }- These commands will restore the backup that you made using a custom recovery on your phone and placed in the Fastboot folder.
  7. <fastboot oem get_identifier_token> <fastboot oem flash Unlock_code.bin> <fastboot oem lock> - {use the codes without <>, one by one }- These commands help you to get the identifier token of your phone that can be used for unlocking the bootloader. The second command helps your to flash the bootloader unlock code, and the 3rd commands helps you to lock your phone’s bootloader once again if locking it is actually allowed.

  • LOGCAT:

  1. adb logcat - Shows you the real time logs of your phone, these logs represent the ongoing process on your device.It is recommended that you run this command while your device boots up to check what’s going on.
  2. adb logcat > logcat.txt - Creates a .txt file containing the logs in the Platform-tools folder or Fastboot folder in Android SDK tools directory.
That’s all for now. I may be missing some of the commands, those may be added later. In case you got any suggestions, queries or face any difficulties, please feel free to stop by the comment box below and drop your words. I will get back to you as quick possible. Cheers!!


tags{ignore}: minimal adb and fastboot zip minimal adb and fastboot commands how to use minimal adb and fastboot motorola device manager minimal adb and fastboot mac minimal adb and fastboot zip for moto e minimal adb and fastboot moto g minimal adb and fastboot 32bit


Sunday, 5 June 2016


HOW TO: REMOVE UNLOCKED BOOT LOADER WARNING MESSAGE

After Successfully Unlocking and Rooting your Device, you will always be "Welcomed" by a rather irritating screen whenever you switch on your device:
So now I would tell you guyz how to remove this WARNING and Switch back to the Old Moto Logo or select from 100s of modified logos{i.e. Boot Logos} present all over the internet.....

There are two methods of doing so: via the ADB FASTBOOT and via TWRP RECOVERY{ONLY IF THE FILE IS FLASHABLE ZIP}

First let us do via the ADB FASTBOOT way:

STEPS{for ADB FASTBOOT} :
  1. Download the Appropriate Boot logo for your device. Google it or if your too lazy for it :p search in xda-developers.com , type your device name, search and download the boot images you like.
  2. Unzip the file [if its in a zip format, obvio!] and place it in the location where you have installed ADB FASTBOOT. {most probably here- C:\Program Files (x86)\Minimal ADB and Fastboot }
  3. The file would be named like name.bin , rename it to logo.bin 
  4. Connect your Device to pc {with debugging turned on}
  5. Open ADB Fastboot and type the following commands: adb reboot bootloader 
  6. Once in fastboot mode, type this{in ADB Fastboot Command Window}:                             
fastboot flash logo logo.bin
      
      8. Now type fastboot reboot to reboot your device......DONE!!!
                          The Good Old Days: Back to Stock Boot logo

STEPS{VIA TWRP RECOVERY} :

1. Place the downloaded logo.zip in your device.DO NOT UNZIP IT!!

2. Go to TWRP recovery from your device. You could do so by switching of your device, pressing Volume Down and Power together for few seconds. Then select {by Volume Up} Recovery from a list of fastboot options like Normal powerup, Recovery,Factory,Switch Consoles,Bar Codes,BP Tools. Or you could install TWRP RECOVERY App from Play Store and directly go to recovery.

3. From TWRP, select Install, Browse and select the file, then select SWIPE AND CONFIRM FLASH.

4. <NOT NECESSARY BUT RECOMMENDED> Go to Home, Wipe, and then Wipe Cache and Dalvik Cache. Then Reboot your Device and your done!!

     
                                          The Stock Logo as seen on Moto G2


tags{ignore}: remove unlocked bootloader warning moto e remove unlocked bootloader warning moto g2 remove unlocked bootloader warning moto g remove unlocked bootloader warning moto g 2014 warning bootloader unlocked moto g stuck warning bootloader unlocked razr i warning bootloader unlocked stuck remove unlocked bootloader warning nexus 6p

UNLOCK AND ROOT YOUR MOTO DEVICE

HERE, I AM GOING TO GIVE YOU DETAILED STEP BY STEP PROCEDURE OF HOW TO UNLOCK, ROOT "ANY MOTO DEVICE", FLASH RECOVERIES AND SUBSEQUENTLY CUSTOM ROMS......

In case you didn't know, bootloader is a little bit of code that tells your device's operating system how to boot up. There stands many advantages of unlocking the bootloader. The best of the lot is the freedom to modify your device as you wish. After unlocking the device, you could easily root it and hence gain all the administrative privileges of your device. Thats not it, you could even flash custom roms and gain additional features through it which your device officially may not even support! 

The biggest disadvantage however is that unlocking the bootloader will void your warranty....but who cares ;) You could easily repair your device from any software error- Even if your Phone is not switching on- just your device needs to be rooted.

So, Lets Begin!!

IMP- 


* Your warranty is now void and you will lose all the data of "internal memory"
* I am not responsible for bricked devices, dead SD cards,
* thermonuclear war, or you getting fired because the alarm app failed.
* YOU are choosing to make these modifications, and if
* you point the finger at me for messing up your device, I will laugh at you.

Although if you follow my tutorials correctly there is no chance your device getting damaged but still I advice you to make a BACKUP OF YOUR INTERNAL MEMORY.

INSTRUCTIONS:

UNLOCKING THE DEVICE
  1. Make sure to take a backup of your entire device data.
  2. Download the Minimal ADB and Fastboot
  3. Install the latest Motorola USB Drivers. Download here.
  4. Go To Settings -> Dev Options, And Select "Allow OEM Unlock" & USB(or ANDROID) Debugging.
  5. Put your device in fastboot mode. There are two ways of doing so-
  • HARDWARE WAY- turn off the phone and press Volume Down + Power Button together.
  • COMMAND WAY{ preferred}- Connect your device to PC, Open Minimal ADB and Fastboot, Type the following code-
adb reboot bootloader
      
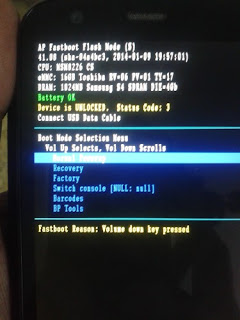
                         Once your device is in Fastboot Mode, your screen will look like this-
                                 {Note the line- Device is LOCKED.  Status Code: 0}
 
     6. Type this in the ADB Command Windows-  fastboot oem get_unlock_data
     7. You will get a string of codes like this-
   
     8. Paste all the lines together in the notepad and REMOVE ALL THE EMPTY SPACES.
     9. Now go to Motorola Site. Sign in. Scroll down the page and paste the copied string 
         from the notepad (having no spaces) in the field. Then click on ‘Can my device be unlocked?’,
         after which a "REQUEST UNLOCK KEY" button will appear at the bottom of page.
    10.To get your unlock key, select the ‘I Agree’ option.
          Note: You will receive an email with your Unlock Key at the email address you used to log in.
    11. Copy the 20-character key that Motorola sent you via email.
    12. Finally type- fastboot oem unlock UNIQUE_KEY
          Where UNIQUE_KEY is the Key You got via email.
    13. Hit Enter, Wait for few seconds AND CONGO!!! Your Device is Unlocked!!
                       { Notice the line now- Device is UNLOCKED.  Status Code: 3 }

[Fed up of the UNLOCKED BOOTLOADER WARNING message that pops up everytime you reboot the device??? Head up to my next post on this same blog to correct it...BUT FIRST ROOT YOUR DEVICE USING THE METHOD GIVEN BELOW]

ROOTING THE DEVICE

After successfuly Unlocking your Device, its time to ROOT it !!

Follow these steps to successfully root your device:

NOTE: FOR ROOTING YOU WILL FIRST NEED TO FLASH A CUSTOM RECOVERY LIKE TWRP (best- supports all moto devices)... The process is describes below:

1. Download the latest TWRP Recovery from here .
2. If it is in zipped format, unzip it and get the .img file.
3. Rename the Recovery as recovery.img
4. Place the recovery in the folder where you have installed the ADB FASTBOOT {something like     this-  C:\Program Files (x86)\Minimal ADB and Fastboot}
5. Connect your device to pc with usb debugging on.
6. Open Minimal ADB and Fastboot and type- adb devices to make sure that your device                         is properly connected. 
7. Now type adb reboot bootloader . Now you will be in fastboot mode.
8. Type in the following code to flash the recovery {Make sure that you have RENAMED                             the recovery as recovery.img} - fastboot flash recovery recovery.img

Now we have successfully flashed the recovery. To root do this:


  1. Download the latest SuperSU from here.
  2. Put it in your SD Card.
  3. Now again go to fastboot mode{ as described above}, move the selection bar down to Recovery option with the help of Volume Down and Select it via Power Up.{This is for most Moto devices, but for some new Moto device i guess the selection is via Power button}.


                                                 TWRP RECOVERY SCREEN

4. Go to Install, Browse to the location where you have kept your SuperSU, Select the SuperSU zip,
5. Click on Swipe To Confirm Flash and Voilllla...YOUR DEVICE IS ROOTED!!!!


NOTE: I have used a DIFFERENT FILE while flashing so dont try to match my messages in TWRP with yours....MY ONLY AIM IS TO SHOW YOU GUYZ HOW TO FLASH A FILE USING TWRP.


MY NEXT POST IN THIS BLOG: HOW TO REMOVE UNLOCKED BOOTLOADER WARNING MESSAGE


tags{ignore}: unlock bootloader motorola xt907 unlock bootloader motorola moto g motorola unlock bootloader website motorola unlock bootloader tool motorola unlock bootloader page motorola unlock bootloader site motorola unlock bootloader moto e unlock bootloader motorola razr xt912 unlock bootloader moto g lollipop unlock bootloader moto g dual sim unlock bootloader moto g unlock bootloader moto g xt1068 unlock bootloader moto g 2nd gen unlock bootloader moto g xt1033 lollipop unlock bootloader moto g2 unlock bootloader moto e