UNLOCK AND ROOT YOUR MOTO DEVICE
HERE, I AM GOING TO GIVE YOU DETAILED STEP BY STEP PROCEDURE OF HOW TO UNLOCK, ROOT "ANY MOTO DEVICE", FLASH RECOVERIES AND SUBSEQUENTLY CUSTOM ROMS......


In case you didn't know, bootloader is a little bit of code that tells your device's operating system how to boot up. There stands many advantages of unlocking the bootloader. The best of the lot is the freedom to modify your device as you wish. After unlocking the device, you could easily root it and hence gain all the administrative privileges of your device. Thats not it, you could even flash custom roms and gain additional features through it which your device officially may not even support!
The biggest disadvantage however is that unlocking the bootloader will void your warranty....but who cares ;) You could easily repair your device from any software error- Even if your Phone is not switching on- just your device needs to be rooted.
So, Lets Begin!!
IMP-
So, Lets Begin!!
IMP-
* Your warranty is now void and you will lose all the data of "internal memory"
* I am not responsible for bricked devices, dead SD cards,
* thermonuclear war, or you getting fired because the alarm app failed.
* YOU are choosing to make these modifications, and if
* you point the finger at me for messing up your device, I will laugh at you.
Although if you follow my tutorials correctly there is no chance your device getting damaged but still I advice you to make a BACKUP OF YOUR INTERNAL MEMORY.
INSTRUCTIONS:

INSTRUCTIONS:
UNLOCKING THE DEVICE
- Make sure to take a backup of your entire device data.
- Download the Minimal ADB and Fastboot
- Install the latest Motorola USB Drivers. Download here.
- Go To Settings -> Dev Options, And Select "Allow OEM Unlock" & USB(or ANDROID) Debugging.
- Put your device in fastboot mode. There are two ways of doing so-
- HARDWARE WAY- turn off the phone and press Volume Down + Power Button together.
- COMMAND WAY{ preferred}- Connect your device to PC, Open Minimal ADB and Fastboot, Type the following code-
adb reboot bootloader
Once your device is in Fastboot Mode, your screen will look like this-

{Note the line- Device is LOCKED. Status Code: 0}
6. Type this in the ADB Command Windows- fastboot oem get_unlock_data
7. You will get a string of codes like this-

8. Paste all the lines together in the notepad and REMOVE ALL THE EMPTY SPACES.
9. Now go to Motorola Site. Sign in. Scroll down the page and paste the copied string
from the notepad (having no spaces) in the field. Then click on ‘Can my device be unlocked?’,
after which a "REQUEST UNLOCK KEY" button will appear at the bottom of page.
10.To get your unlock key, select the ‘I Agree’ option.
Note: You will receive an email with your Unlock Key at the email address you used to log in.
11. Copy the 20-character key that Motorola sent you via email.
12. Finally type- fastboot oem unlock UNIQUE_KEY
Where UNIQUE_KEY is the Key You got via email.
13. Hit Enter, Wait for few seconds AND CONGO!!! Your Device is Unlocked!!
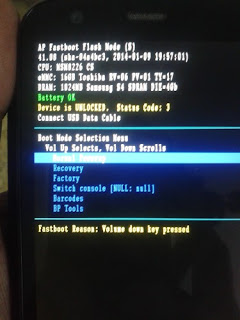 { Notice the line now- Device is UNLOCKED. Status Code: 3 }
[Fed up of the UNLOCKED BOOTLOADER WARNING message that pops up everytime you reboot the device??? Head up to my next post on this same blog to correct it...BUT FIRST ROOT YOUR DEVICE USING THE METHOD GIVEN BELOW]


NOTE: I have used a DIFFERENT FILE while flashing so dont try to match my messages in TWRP with yours....MY ONLY AIM IS TO SHOW YOU GUYZ HOW TO FLASH A FILE USING TWRP.
6. Type this in the ADB Command Windows- fastboot oem get_unlock_data
7. You will get a string of codes like this-

8. Paste all the lines together in the notepad and REMOVE ALL THE EMPTY SPACES.
9. Now go to Motorola Site. Sign in. Scroll down the page and paste the copied string
from the notepad (having no spaces) in the field. Then click on ‘Can my device be unlocked?’,
after which a "REQUEST UNLOCK KEY" button will appear at the bottom of page.
10.To get your unlock key, select the ‘I Agree’ option.
Note: You will receive an email with your Unlock Key at the email address you used to log in.
11. Copy the 20-character key that Motorola sent you via email.
12. Finally type- fastboot oem unlock UNIQUE_KEY
Where UNIQUE_KEY is the Key You got via email.
13. Hit Enter, Wait for few seconds AND CONGO!!! Your Device is Unlocked!!

[Fed up of the UNLOCKED BOOTLOADER WARNING message that pops up everytime you reboot the device??? Head up to my next post on this same blog to correct it...BUT FIRST ROOT YOUR DEVICE USING THE METHOD GIVEN BELOW]
ROOTING THE DEVICE
After successfuly Unlocking your Device, its time to ROOT it !!
Follow these steps to successfully root your device:
NOTE: FOR ROOTING YOU WILL FIRST NEED TO FLASH A CUSTOM RECOVERY LIKE TWRP (best- supports all moto devices)... The process is describes below:
1. Download the latest TWRP Recovery from here .
2. If it is in zipped format, unzip it and get the .img file.
3. Rename the Recovery as recovery.img
4. Place the recovery in the folder where you have installed the ADB FASTBOOT {something like this- C:\Program Files (x86)\Minimal ADB and Fastboot}
5. Connect your device to pc with usb debugging on.
6. Open Minimal ADB and Fastboot and type- adb devices to make sure that your device is properly connected.
7. Now type adb reboot bootloader . Now you will be in fastboot mode.
8. Type in the following code to flash the recovery {Make sure that you have RENAMED the recovery as recovery.img} - fastboot flash recovery recovery.img
Now we have successfully flashed the recovery. To root do this:
- Download the latest SuperSU from here.
- Put it in your SD Card.
- Now again go to fastboot mode{ as described above}, move the selection bar down to Recovery option with the help of Volume Down and Select it via Power Up.{This is for most Moto devices, but for some new Moto device i guess the selection is via Power button}.

TWRP RECOVERY SCREEN
4. Go to Install, Browse to the location where you have kept your SuperSU, Select the SuperSU zip,
5. Click on Swipe To Confirm Flash and Voilllla...YOUR DEVICE IS ROOTED!!!!
4. Go to Install, Browse to the location where you have kept your SuperSU, Select the SuperSU zip,
5. Click on Swipe To Confirm Flash and Voilllla...YOUR DEVICE IS ROOTED!!!!


NOTE: I have used a DIFFERENT FILE while flashing so dont try to match my messages in TWRP with yours....MY ONLY AIM IS TO SHOW YOU GUYZ HOW TO FLASH A FILE USING TWRP.
MY NEXT POST IN THIS BLOG: HOW TO REMOVE UNLOCKED BOOTLOADER WARNING MESSAGE
tags{ignore}: unlock bootloader motorola xt907 unlock bootloader motorola moto g motorola unlock bootloader website motorola unlock bootloader tool motorola unlock bootloader page motorola unlock bootloader site motorola unlock bootloader moto e unlock bootloader motorola razr xt912 unlock bootloader moto g lollipop unlock bootloader moto g dual sim unlock bootloader moto g unlock bootloader moto g xt1068 unlock bootloader moto g 2nd gen unlock bootloader moto g xt1033 lollipop unlock bootloader moto g2 unlock bootloader moto e
but how can i install if it is locked
ReplyDelete